
Clearing A Jam's For all
If you have a 3D printer, you will inevitably be clearing a jam. It is simply a fact of 3D printing life. This guide can help you deal with that as painlessly as possible.
At some point during your 3D printing adventure, you are inevitably going to come across a jam in your extruder. Here are some basic tips on what causes jams, prevention, and what to do when a jam occurs.
Table Of Contents
1. What Causes Jams?
-Fused Deposition Modeling (FDM)
-Anatomy Of A Hot End
-Ground-out Filament
-Temperature
-Nozzle Height
2. Preventing Jams
-Calibration And Nozzle Height
3. Ways To Clear A Jam
-Pushing In And Pulling Out Filament
-Keeping Pinch Wheel Clean
-Taking Apart The Hot End

Source: http://reprap.org/wiki/File:FFF.png
Fused Deposition Modeling (FDM)
The type of 3D printers we will be addressing in this guide are FDM (fused deposition modeling) 3D printers. They are also known as Fused Filament Fabrication (FFF) printers. This means that these printers are controlled by computer programs and use the method of heating up thermoplastics to create layered materials.
The printing material can be separated into two different types: modeling material and support material.
Modeling material is what the majority of the model will be printed as. Any overhang generally needs to be supported by support material, which is not a part of the print itself but is there to literally support any material that would otherwise be taken down by gravity.
FDM 3D printers will have a similar anatomy in the hot end of these main components:
- Motor
- Pinching Mechanism
- Can include an idler, spring tension system, or anything else that will provide more friction to the hobbed bolt (pinch wheel).
- Nozzle
As a disclaimer, there will be variations in anatomy as different manufacturers use different components and have different designs. The printers we will mainly be referencing in this guide are the Airwolf v5.5/XL and the Type A Series 1.
On an Airwolf, the Quick Release Latch (QRL) is the "Friction Provider"; is the part pushing the filament against the pinch wheel (also known as the hobbed bolt) using tension provided by two springs. This is so that the pinch wheel has enough friction against the filament, and the idler can help push the filament through. In this mechanism, there are two screws with springs attached going through the QRL. Spring tension in the Quick Release Latch is important as its tightness will determine how much friction the filament will have against the hobbed bolt. The Airwolf also has gears on the outside to give the pinch wheel mechanism more torque- not every 3D printer has these.
Below the QRL is the idler, which is a wheel that further assists the filament's journey through the extruder.
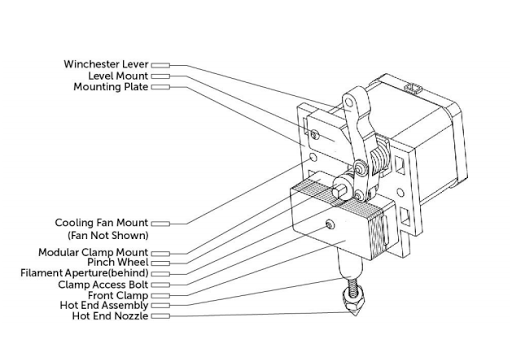
Type A Series 1 Hot End Anatomy (Source)
On other FDM printers, there will be an equivalent piece of hardware providing tension against the pinch wheel. For example, the Type A Series 1 uses a Winchester lever, while the Airwolf uses a combination of a Quick Release Latch and a hobbed bolt.
One common cause of jams is the nozzle being too close to the bed. This causes a portion of the filament to be pushed back into the nozzle, causing the filament to create reversed pressurized resistance. With 3D printing, the slightest change in height (down to the .1mm level) can determine whether the filament will even stick or if it is the start of a jam. To prevent this, check out the graphic and text below.
Regardless of what type of filament you are using, you will need to make sure you are printing at the proper temperature. If you are trying to print at too low of a temperature, either the filament will simply not extrude or so little of it will extrude so cold that it will block the nozzle.
If you are printing at too hot of a temperature, you may not get a jam but your filament will not extrude correctly. It will come out stringy and/or goopy/drippy. The filament may also come out a bit bubbly.
The general rule for PLA temperatures are anywhere between 190-215C. We generally print PLA at 195C.
ABS is generally printed between 215-240C. We find a good middle ground to be 230C.
Printing temperatures will vary by manufacturer based on their hardware, and the best temperature for filament can vary by color as well. Different chemicals used in the different pigments will change the melting temperature of the filament.
Sometimes during a print, the pinch wheel, which is responsible for extracting and retracting the filament, will begin to grind into the filament. This ceases its ability to be effectively extruding and retracting, because the filament is incapable of moving as it is being ground into. The filament is most likely not moving because there is either little lubrication or there is a jam closer to the nozzle preventing the filament from being pushed out. Since it is remaining stagnant, the gear will keep doing its job so it will begin to eat away at the filament.
If there is a jam or if the part tension isn't high enough, then the filament may not have enough friction against the biting gear for the biting gear to actually cause it to extrude or retract. This can cause the biting gear to dig into the filament, as the filament is stagnant.
Solving this issue is discussed in the Pushing In And Pulling Out Filament section of this article.
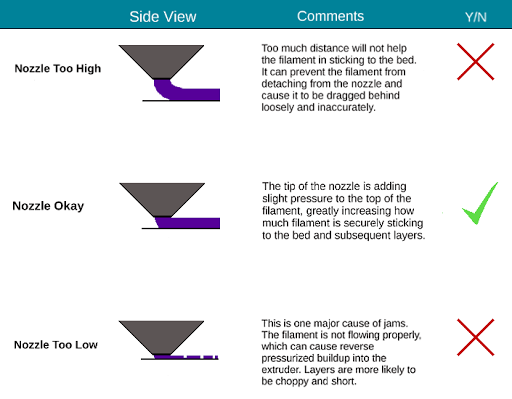
The distance between the end of the nozzle and the bed is a huge determining factor in whether or not your printer will get jammed. If it is too close, the pressure from the filament being driven into the extruder meeting with the pressure from the bed not allowing maximum filament flow, thus causing a backup. it is not life or death, but it is jam or butter.
This problem can be prevented by ensuring that the Z axis is the right height above the bed. If the nozzle is too high, then filament will come out very loosely, resulting in non-accurate layers and filament that is too cool to stick to the bed and/or subsequent layers.
To do this, you will need to calibrate your bed (and re-calibrate periodically, 3D printers lose their calibration over a period of time and use). To ensure that your entire bed is level, instead of just one area, printing this .stl file of a Calibration Circle will allow you to see how your filament is being extruded and if any areas are more level than others.
Once you have your bed calibrated, you may want to look into the Automatic Print Leveling feature, which actively works to maintain your bed's optimum levelness through our software, MatterControl. Depending on your printer configuration, Automatic Print Leveling may be the option for you.
Pushing In And Pulling Out Filament
Filament stuck and not budging? Heat up the filament to the printing temperature (or a few degrees higher if it is not coming loose easily), release the pinching system, and gently use pliers to pull the filament out. If it is not pulling out easily, cut the filament as close to the extrusion hole as possible. Then, heat up the hot end to printing temperature and push it through with a small tool or needle that will fit through the extrusion hole. If it is coming out of the nozzle properly, you can insert new filament and extrude it until it changes color. The pressure of the new filament pushing out the old should be seamless.
In general, your pinch wheel will probably not have to be regularly cleaned unless you have a jam, and specifically for when the filament gets ground-out. When each tooth has filament built up in it, it turns the pinch wheel into a smooth surface, preventing it from gaining any traction on the filament. This is akin to why tennis shoes have multi-level bottoms and why dress shoes are smooth. To clean this, use a small, flathead screwdriver, insert in between each tooth, and use a couple side-to-side swiping motions to clear each one.
Here are easy-to-follow steps to clear a jam from an Airwolf 3D printer:
1) Power off your printer
2) Locate and remove the two hex screws underneath the X carriage (See Photo #1)
3) Lift the extruder driver up from the X carriage (See Photo #2)
4) Carefully set the extruder driver on the railing (See Photo #3)
5) Power on your printer
6) Heat up the extruder to ~230 degrees Celcius
7) Find a tool like a hex wrench and gently push the jam through the extruder (See Photo #4)
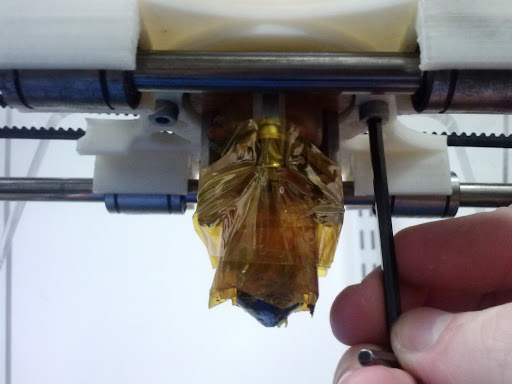
Photo #1: Locate and remove the two hex screws underneath the X carriage.
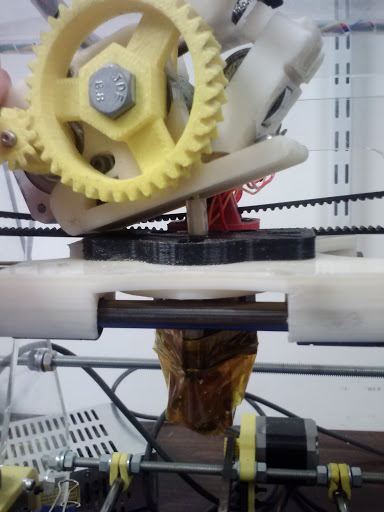
Photo #2: Lift the extruder driver up from the X carriage.
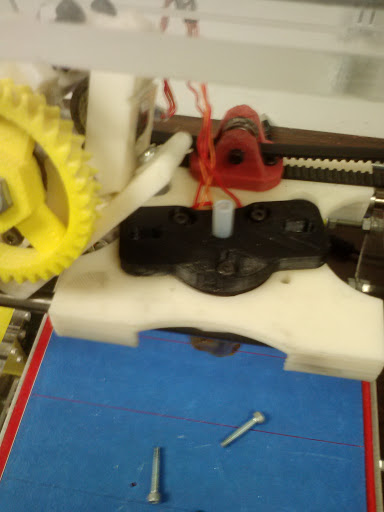
Photo #3: Carefully set the extruder driver on the railing.
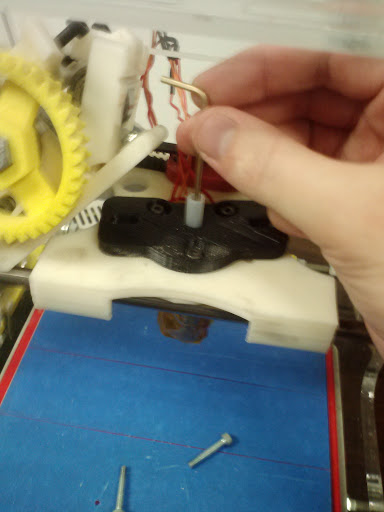
Photo #4: After heating up the extruder to ~230 degrees Celcius, find a tool like a hex wrench and gently push the jam through the extruder.